The focus of this guide is to assist the raid in overcoming the challenges of Naxxramas boss fights. It will not go into details around how the loot system works.
Consumables
All raiders are expected to bring consumables to each raid. The numbers below are for progression only.
10 x Major Healing Potions
20 x Major Mana Potions for casters
10 x Greater Nature Protection Potions
5 x Nature Protection Potions (Recommended)
10 x Greater Fire Protection Potions
10 x Greater Frost Protection Potions for casters
10 x Greater Shadow Protection Potions
10 x Shadow Protection Potions
5 x Greater Arcane Protection Potions
5 x Limited Invulnerability Potions
Bandages
Anti-Venom Bandages x 3 of each type
Anub'Rekhan
This is the first boss of the spider wing. He comes with 2 guards, which will be killed before any DPS is applied to the boss. All corpses - both players and NPC - will spawn a group of corpse scarabs. These will need to be gathered and cleaned up with AoE. The boss has two other abilities, Impale which can be mitigated with positioning, and Locust Swarm which will require the boss and the raid to move across to the other side of the room. Along with the Locust Swarm comes an add which is to be prioritized over the boss.
Boss Abilties
HP 1,500,000
Impale - Targets a raider within 35 yards and travels from the boss in a line to the target. The target player takes 4k dmg and any raiders in the line get knocked into the air and take 1k each.
Corpse Scarabs - Any corpse, both player and NPC, spawns 10 corpse scarabs that need to be killed.
Locust Swarm - Every 70 to 120 seconds within a 30 yard range of the boss, everyone is silenced and taking AoE damage. Anub'Rehkan is slowed to 40% during this effect, allowing him to be easily kited. See diagram.
Crypt Guard's Abilties
Crypt Guard
Stunable
3 target frontal cleave for 1,000.
Stacking Poison on target.
AoE immobilizing Web.
Corpse Scarabs
HP 6,000
Hit for 400
All CC work.
Role Specific Tasks
Tanks
Main defensive tank on Anub'Rehkan. Threat isn't an issue as dps will kill adds first.
MT during Lotus Swarm will need to kite the boss along edge of the poison but stay out of the 30 yard range. Swiftness potion / hunter aura is used here.
2 tanks on X add taking turns at 4 poison stacks.
1 tank on skull add.
Crypt Guards can be stunned.
Both adds should be tanked together facing away from raid.
Add spawns during lotus swarm needs to be picked up and pulled out of range of the swarm.
Melee DPS
Kill skull and X.
Crypt Guards can be stunned.
Run across room and out of range during Lotus Swarm.
Kill new add before getting back on boss.
Ranged DPS
One hunter will help tank with runspeed aura during kite.
CC and AoE corpse scarabs.
Spread out to avoid taking extra Impale damage.
Run across room and out of range during Lotus Swarm.
Kill new add before getting back on boss.
Healers
3 - 4 healers assigned to main tank.
2 - 3 healers assigned to offtank.
Raider targeted by Impale will need 4k healing.
Grand Widow Faerlina
This boss is a DPS race and comes with 2 followers and 4 worshippers. The followers charge and silence, but don't hit hard and will be tanked near the back of the room. The worshippers will be tanked until they are needed for their ability to remove Faerlina's enrage, which she uses every minute. A priest will Mind Control one of the Worshippers and run her over to Faerlina and use their Widows Embrace ability to remove her enrage, sacrificing that worshipper in the process. There's also a rain of fire that will need to be avoided and a poison volley that goes out, which players can remove with their Anti-Venom bandages.
Boss Abilties
HP 1,500,000
Poison Bolt Volley - Hits 10 players for 1400 damage and a 400 damage dot.
Rain of Fire - AoE rain for 2k per wave.
Enrage - Increased attack speed by 75% and damage.
Followers
Naxxramas Follower
HP 100,000
Stunable
Charge
Silence
Naxxramas Worshipper
HP 250,000
Widows Embrace - Cancles Faerlina's enrage and prevents poison volley for 30 seconds.
Role Specific Tasks
Tanks
Main tank will pick her up and build threat quickly.
One tank pick up the followers and pull them far to the back of the room.
Other tanks pick up 2 Worshippers each.
Melee DPS
Be quick to use Anti-Venom if you get hit by volley.
Do not stand in the Rain of fire.
The use of consumables is recommended if the fight is posing difficulties.
Ranged DPS
Spread out to avoid Rain of Fire, move as necessary.
Be quick to use Anti-Venom if you get hit by the volley.
The use of consumables is recommended if the fight is posing difficulties.
Healers
Bubble tank as Faerlina enrages.
Mind Controlling priest be ready to use ability but don't do so until AFTER the enrage happens.
Maexxna
The final boss of the spider wing has several abilities that work on regular timers which all need to be adapted to. She should be tanked in the middle of the room facing away from the raid. The main tank will need Necrotic Poison removed instantly. She uses Web Wrap which assigned ranged DPS will work to counter. She spawns 8 to 10 spiders under her that must be AoE killed before her web spray goes out 10 seconds later. Web Spray is cast every 40 seconds and incapacitates everyone in the room for 8 seconds, and it cannot be resisted. The tank will need to be topped up, bubbled and have abolish poison on for this.
At 30% life she will enrage so it's important to push her over that threshold just after a Web Spray has gone out. The main tank will need to use Shield Wall during the Web Spray during the enrage and any remaining cooldowns during any following cycles.
Boss Abilties
HP 1,500,000
Necrotic Poison - Reduces healing on the tank by 90% for 30 seconds. Instantly cleanse. Throw Abolish Poison on the tank before Web Spray.
Web Wrap - Starting 20 seconds into the fight and every 40 seconds after that, Maexxna will web up 3 players, pinning them to the wall. While webbed, these players will take 600-800 nature damage every 2 seconds. People dedicated to web duty will need to free them and healers will need to top them off once freed.
Spiders - Starting at 30 seconds into the fight and 10 seconds after every Web Wrap, Maexxna will spawn 8 - 10 small spiders directly under her. A tank will need to demo shout them to draw their aggro and then they should be AoEd down. Warlocks should not use Hellfire. These spawns need to be dead before her next ability, Web Spray.
Web Spray - 40 seconds into the fight and every 40 seconds after she will incapacitate everyone for 8 seconds and deal 2k damage to all. This cannot be avoided and the tank will need to be prepared. The tank should have full life and HoTs as well as a bubble and abolish poison running by the time this ability is used.
Role Specific Tasks
Tanks
Main tank keep agro and face her away from the door and the raid.
Off tanks pick up the spider adds at 30 seconds and every 40 seconds after that.
Melee DPS
Help kill all the spiders at 30 seconds.
Make sure not to push her past 30% life until called.
Ranged DPS
Assigned range will help free trapped players from Web Wrap.
AoE down the spiders at 30 seconds.
Make sure not to push her past 30% life until called.
Healers
Prep the main tank before Web Spray.
Players caught in Web Wrap will need healing.
Cleanse Necrotic Poison on Main Tank.
Patchwerk
Patchwerk is a gearcheck and requires minimal strategy. All healing will go to the tanks, primarily the offtanks which will be keeping their threat high to receive hateful strikes. This hit will strike one of the top 3 threat with high health that aren't the main tank for around 8k. Healers will be broken up to make sure that these offtanks are always ready to receive the strike. Melee will use the poison stream nearby to lower their life (to avoid being targeted by the hateful strike) and then will DPS like mad. After 7 min Patchwerk will enrage. Save cooldowns for the last 5% of his life as he also enrages there.
Boss Abilties
HP 3,850,000
Hateful Strike - Hits highest % health non main tank target for 8k damage roughly every 1.2 seconds.
On Main Tank - 2500+ damage
7:30 min enrage
Role Specific Tasks
Tanks
Save cooldowns for last 5% enrage.
Melee DPS
Step into and out of the poison river to lower life, then dps hard.
Ranged DPS
Spread out at range and dps hard but don't pull threat.
Healers
Main tank will recieve manageable white damage.
Offtanks will need to be topped off after a hateful strike so they are ready for the next one.
Grobbulus
This fight is all about positioning and raiders knowing how to react to Mutating Injection. The boss drops poison clouds regularly at his feet that slowly grow in size and stay for a long time. The Main tank will slowly move him around the edge of the room. These clouds are also triggered when Mutating Injection is either removed or activates. It's important that the raiders who get Mutating Injection run to a spot behind the raid group and then get dispelled. One healer will be assigned dispel duty and will be the only one dispelling this effect when the affected raider is safely away from raid. Nobody apart from the main tank will be in front of Grobbulus as his Slime Spray will create a Fallout Spawn for each target hit. Each slime will be picked up my an offtank and killed by the melee DPS.
Boss Abilties
Poison Cloud - Cast under boss and slowly expands. Does damage to all within it.
Mutating Injection - After 10 seconds will do 4500 damage to target and release a Poison Cloud. If dispelled it will deal less damage, but it still drops the cloud.
Slime Spray - Frontal cone from boss creates a Fallout Spawn add for each raider hit.
Fallout Spawn - Will generally rush to healers, should be tanked and killed by DPS.
12 minute enrage timer.
Role Specific Tasks
Tanks
Main tank slowly pull Grobbulus along the wall around edge of the room, avoiding standing in the Poison Clouds.
Off tanks will pick up and tank Fallout Spawns off to the side of the raid.
Melee DPS
Be aware of where to run if you get the Mutating Injection.
Kill Fallout Spawns.
Ranged DPS
Be aware of where to run if you get the Mutating Injection.
DPS Boss
Healers
Be aware of where to run if you get the Mutating Injection.
One healer will be tasked with removal of the Mutating Injections, only once the affected player is in the correct place.
Gluth
This large hound requires two tanks and a dedicated kiting team consisting of mages, hunters and a Fury warrior. One hunter will be assigned to use Tranquilizing Shot to remove Gluths Frenzy ability. Tanks will alternate tanking upon getting 4 or 5 stacks of Mortal Wound, which reduces the healing they receive. A fear ward should always be kept on the main tank so that when the Terrifying Roar is used it keeps Gluth from moving from his position near the door.
While the DPS are working on the boss, the mages and hunters are kiting an ever-growing number of Zombies. The goal is not to kill them but to keep them under control and keep the kiters alive.
The big mechanic is when Gluth uses Decimate, which drops every player and every zombie in the room to 5% life. The tank must get healed right away while the rest of the raid turns and works on killing all the zombies, which now head towards him. Any zombies that get near him he consumes and it heals him. As the only damage going out at this point should be hitting the tank, healing up the raid isn't the high priority - instead make sure all the zombies are killed and that the tank keeps Gluth in place.
Please note new zombies continue to spawn so the kiters will need to be healed first so as not to die.
After 3 decimates Gluth enrages.
Boss Abilties
Mortal Wound - Each stack reduces healing by 10%. He cannot be taunted so tanks must manage their threat.
Frenzy - Simply tranqulizing shot to remove.
Terrifying Roar - AoE fear. Main tank needs to be fear warded. 20 yard range.
Zombies - Zombies will spawn at the green grates every 10 seconds. They need to be kited around the back of the room and they also have a stacking debuff that increases melee damage taken.
Decimate - Every 105 seconds this ability reduces the life of all raiders and zombies to 5%. Tank need to be healed quickly.
Role Specific Tasks
Tanks
Gluth cannot be taunted.
Two main tanks alternate Gluth tanking at 4 or 5 stacks of Mortal Wound.
Be ready to pop a consumable right after the Decimate to not die to an unlucky hit.
Melee DPS
Focus on boss till Decimate goes out.
Kill zombies, prioritize those that are closest to Gluth or that aren't being hit by the AoE.
Ranged DPS
Hunters use Tranquilizing Shot to remove Gluth Frenzy.
Focus on boss till Decimate goes out.
AoE the bulk of the Zombies after Decimate.
Stay out of range of the fear.
Kite Team
Mage kiters use rank 1 cone of cold.
Hunters put down frost traps.
Fury warrior run around and use Piercing Howl to keep Zombies snared.
Healers
Keep a fear ward on the tank that will be tanking during the Terrifying Roar, which may well be the current offtank.
As Decimate goes out make sure tank has bubble and gets topped up fast.
Kite team needs to be the first players in raid to be healed after the tank post Decimate as they will be picking up new Zombies.
Rest of the raid doesn't need to be healed much, just throw out some smaller heals to keep them above 15%.
Thaddius
The use of left and right in this description will always be assuming looking into the room from the entrance door.
This boss fight consists of two phases. This fight is fun and pretty easy as long as raiders focus. Any one raider however can cause massive damage to the whole raid, forcing wipes.
Phase one
In phase one the raid will be split up onto two platforms fighting Stalagg and Feugen. Casters will be on the left fighting Stalagg who hits harder and melee will be on the right fighting Feugen who has an AoE Mana drain. Both have a thunderclap, which will hit the melee on the right so healers need to keep them alive. Every 20 seconds the tanks will be flung across the room to the other side. Healers need to be ready to keep the arriving tank alive and DPS need to hold off on damage during the transition. They can be taunted. Both targets need to be killed close together or they will resurrect.
Phase two
Once both are dead the raid needs to JUMP down to the main platform. Don't fail, simply running off will drop you in the goop with a long walk of shame.
The raid will stack up in front of Thaddius in one clump. All raiders need to pay attention to the Polarity Shift they receive.
Raiders who get red - will go to the left side.
Raiders with who get blue + go to the right side.
Throughout the fight, making sure to move or stay based on each new polarity shift is the most important thing for everyone. If moving from one side to the other, make sure you run counter clockwise always. 5 seconds after the polarity shift occurs any raider still near a raider of opposite polarity will deal 2k damage to each other. That means if one person doesn't move they will deal 2k damage to each of the 20 raiders on that side and they will take 40k damage. Raiders near other raiders with the same polarity will give each other a stacking damage buff however which allows the raid to generate the damage needed to kill Thaddius.
If you fail the jump the first time and come into the fight late do not join into either group as you may not have a polarity, which has the same effect as having the wrong polarity. Stand off to the side a safe distance and wait till you receive a polarity then safely join the correct team. Also ranged DPS (hunters) make sure you are not too far back as the time needed to switch sides is tight.
After 5 minutes on phase two the boss berserks and kills the raid.
Boss Abilties
HP 6,700,000
Hits for 2k
Can be taunted
Polarity Shift - Every 30 seconds everyone in the raid will receive either a positive or negative polarity. Negative should stack on left and positive on right side.
Chain Lightning - Will strike up to 8 targets for damage.
Lightning Ball - If no one is in melee range he will cast these for 8k nature damage.
Role Specific Tasks
Tanks
In phase one make sure you tank the boss near the coil.
Taunt your new target after switch.
Melee DPS
Stop DPS during the transfer in Phase one.
Be at max melee range on Thaddius in Phase two.
Ranged DPS
Stop DPS during the transfer in Phase one.
Be at max melee range on Thaddius in Phase two.
Healers
In Phase one, the tank on Stalagg will need a lot of healing.
Melee on Feugen will all need healing due to thunderclap.
Phase two the raid will take some damage from Chain Lightning.
Noth the Plaguebringer
Noth is the first boss of the plague wing and has a fair array of abilities that need to be dealt with. The most important is Curse of the Plaguebringer which needs to be removed from everyone in the raid within 9 seconds or it will cause a raid wipe. Each mage and druid will be assigned a group to decurse.
He also raises skeletons from the 3 bone piles positioned North West, North East and South West which will need to be picked up by tanks and pulled into the melee group to be killed by cleaves and AoE. This has to happen quickly so the tank can return to pick up the next waves.
Noth will cripple everyone near him every 25 seconds and then Blink and wipe agro. He cannot be taunted. The Main tank will need to be cleansed and quickly engage Noth again. All DPS on Noth needs to wait while this occurs.
90 seconds into the fight, Noth will teleport onto his balcony and spawn two waves of Plague Champions / Guardians which need to be offtanked and killed. Once those are dead or after 70 seconds he will return to the room. He will do this several more times at increments but if DPS is alive he should die pretty quickly.
Boss Abilties
Curse of the Plaguebringer - Hits closest 20 targets. This curse changes to Wrath of the Plaguebringer after 10 seconds which spreads throughout the raid and does massive shadow damage, likely causing a wipe.
Cripple - Slows movement and attack speed, should be dispelled off all.
Blink - 25 Cooldown wipes agro and moves him randomly within the room about 20 yards.
Raise Skeletons - Every 30 seconds he raises a skeleton at each of the 3 piles.
Plagued Adds
Plagued Champions
34.5k hp
Cleave
Can be Shackled
Plagued Guardians
Cannot be Shackled
Can be stunned
Casts AoE
Role Specific Tasks
Tanks
Main tank needs to be ready to quickly regain threat after Blink agro wipe. Use intercept when possible.
Offtanks pick up skeletons as they spawn near the piles and run them into the melee quickly to have them burnt down then get back in place for next round.
Burning balcony phase Pick up the larger Plague Champions / Guardians.
Melee DPS
Help burn down skeletons brought in by offtanks.
Use cooldowns wisely to time with possible Blinks.
During balcony phase stuns help with Plagued Gaurdians.
Stop DPS after Blink until tank has agro.
Ranged DPS
Mages - Decurse your assigned group!
Rest of ranged help with skeletons on offtanks as needed but mostly focus boss.
Stop DPS after Blink until tank has regained aggro.
Healers
Druids - Decurse your assigned group!
Cleanse the cripple first off main tank then rest of raid.
Shackle can be used on Plagued Champions (but not on guardians).
Heigan the Unclean
After the suppression room it's time for Heigan and his safety dance. The fight consists of two phases. In phase one the healers and casters are on the stage and the tank and melee are in the room. Heigan uses Spell Disruption near him, which increases cast times by 300% as well as a mana burn. He also casts Decrepit Fever, which is a disease that needs to be removed.
While the casters chill on the stage the tank and melee will move around the room starting in the first position. The eruptions occur every 10 seconds in phase one.
Heigan will also randomly teleport 3 players down the eyestalk hallway. They will need to make their way back to the room. The slimes will reset agro after a short while but the eyestalks that attack will need to be killed. Reenter the room when the safety dance is in the number four position but make sure you are back in the room before Phase two or you will die in the hallway.
Phase two starts after Heigan teleports onto the platform at around 90 seconds. Everyone will gather in the one position and run through the safely dance but now each eruption happens after 3 seconds. Phase two lasts 45 seconds at which point the fight returns to phase one.
There are many videos about the safety dance, please take the time to watch a few until comfortable with the movement. Raiders will be expected to know how to move during this phase.
Boss Abilties
HP 1,780,000
Spell Disruption - Increases cast time by 300%. Cast around Heigan.
Decrepit Fever - Disease cast on random raiders. Reduces maximum health by 50% and deals 500 nature damage every 3 seconds. Cleanseable.
Eruption - Causes 3/4 of the room to erupt in poison dealing massive nature damage to raiders there.
Teleport player Teleports 3 random players down to the hallway near Lotheb.
Mana Burn - 20 yard aura near Heigan that burns mana.
Role Specific Tasks
Tanks
Main tank will want to be very knowledgeable about the safe areas and move Heigan into position with time to spare.
Melee DPS
Be aware of movement of phase two safety dance.
Ranged DPS
Be aware of movement of phase two safety dance.
Healers
Be aware of movement of phase two safety dance.
Cleanse the Decrepit Fever quickly.
Loatheb
The final boss of the plague wing is a DPS race with some interesting mechanics. He has 5.3 million health and will need to killed before 5:25 minutes as at that stage the raid will wipe. Every healer will be limited to casting a single heal spell each minute and all of these will be going onto the tank.
The raid suffers from Inevitable Doom a spell that cannot be removed or resisted but can be mitigated with Greater Shadow Protection Potions as well as a Poison Aura that will hit melee.
There is, however some good news. Every 12 second a spore will spawn which will debuff the closest 5 raiders with an effect that will increase their critical hit chance by 50-60% and also make all their damage generate no threat for 90 seconds.
The assigned DPS will move into position to get the debuff and then return to the boss and go nuts.
Consumables rotation:
Pre pull: Greater Shadow Protection Potion
2:10 Greater Shadow Protection Potion
2:40 Nothing
3:10 Bandage
3:40 Healthstone
4:10 Greate Shadow Protection Potion
5:10 Bandage
5:25 Anything left
Boss Abilties
HP 5,330,000
Corrupted Mind - Debuff that limits healing spell types to one per minute on spells below.
Lesser Healing / Flash Heal / Greater Heal / Heal
Cleanse / Power Word Shield / Prayer of Healing / Holy Nova
Poison Aura - 5 yard range 196 poison damage every 6 seconds for 12 seconds.
Inevitable Doom - Inflicts 2550 Shadow damage after 10 seconds. 100 yard range. Initialy cast at 120 seconds and then every 30 seconds until 300 seconds. After that cast every 15 seconds.
Decurse - Every 30 seconds removes all curses on himself.
Fungal Bloom - Increases critical hit chance by 50% and spell critical hit by 60% and causes all abilities to generate no theat. Lasts 90 seconds. 5 targets per bloom.
Role Specific Tasks
Tanks
Use max mitigation gear.
Melee DPS
Make sure you're out of poison aura while you bandage.
Move to spore for the fungal bloom buff at the correct time.
Ranged DPS
Move to spore for the fungal bloom buff at the correct time.
Warlocks reapply curses when removed.
Healers
Paladins use Judgment of Light to help melee.
Follow the healing rotation so as not to waste the heal window.
Instructor Razuvious
This boss hits incredibly hard and the initial pull is the difficult part. He won't be tanked much by raiders, instead he will be tanked by his understudies while they are mind controlled. It's vital that his Disrupting Shout not hit mana users as it will most likely kill them.
Initially hunters will tag and pull the 4 Understudies to the top of the ramp while a rogue using evasion will agro and pull Razuvious to the base of the ramp on the right side. The understudies will be tanked and Mind Controlled by priest who need to be carefully positioned to be out of range of the Disrupting Shout. Once the Understudie is in position he will use shield wall and taunt the boss and tank for 25 seconds at which point a new Understudie will replace him repeating the cycle.
Boss Abilties
Unbalancing Strike - Hits for 50k on cloth. Shield wall tank might survive one.
Disrupting Shout - AoE shout 45 yard range every 25 seconds. Burns 4000 mana dealing twice that in damage. Use line of effect to avoid.
Death Knight Understudies
Death Knight Understudy's Abilities
100k health
1.5k per hit on tanks
Shield Wall - Reduce incoming damage by 75%. 20 second duration with a 30 second CD.
Taunt - 20 second duration 60 second CD which taunts boss onto Understudy.
Immune to Mind Control for 60 seconds after it drops.
Role Specific Tasks
Tanks
Threat is not an issue, use high mitigation gear.
Tank the Understudies so that the priests can easily pick them up.
Do not use sunder armor on Understundies.
If you do need to tank Razuvious use shield wall immediately before taunt.
Melee DPS
Once the pull is done and the Understudy is tanking threat should not be an issue. DPS hard.
Rogues can tank Razuvious a while with evasion if fight is close.
Ranged DPS
Once the pull is done and the Understudy is tanking threat should not be an issue. DPS hard.
Make sure to hide before Disrupting Shout as it will kill you.
Healers
Make sure to hide before Disrupting Shout as it will kill you.
Heal the Understudies while they tank.
Two priests who are doing Mind Control use 3% spell hit gear.
Priest doing Mind Control should say when the Shield wall if fading so next Understudy can be put into place.
All raid damage will be on offtanks or the Understudies.
Gothik the Harvester
Gothik does not enter the fight for the first 4:34 minutes, instead, he sends waves against the raid. The raid is split between the living (caster) and the dead (melee) side. As the waves are killed the mobs move from living to dead side where they must be killed again.
Live side targets are easier to CC and weaker meaning that the speed at which they are killed and sent over should match the speed at which dead side can finish them off.
Waves stop spawning at 3:44 minutes, 50 seconds before Gothik comes down. Tanks and healer will be split with extra tanks on dead side.
In phase 2, Gothik will teleport between the two sides until he reaches 30% at which point the doors will open and the raid can combine.
Boss Abilties
HP 380,000
Shadow Bolt - chain casts on random targets from 2250 to 2750 damage
Harvest Soul - Stacks. Can not be dispelled and will decrease stats by 10%
Live Side Adds
Spawn near the east side.
Unrelenting Trainee
CC that works - Sheep, Fear, Frost Nova
HP 4500
Hits for 350
Eagle Claw - Physical damage every 3 seconds for 15 seconds
Knockdown - Short stun
Unrelenting Death Knight
CC that works - Shackle, Frost Nova
HP 18,000
Hits for 800
Intercept - 40 dmg and stuns for 3 seconds
Shadow Mark - Melee attack which hits for about 1000 on the tank. Applies Shadow Mark for 15 seconds allowing the Unrelenting Rider's Shadow Bolt Volley to hit
Unrelenting Rider
CC that works - Snares
HP 25,000
Hits for 1500
Unholy Aura - 400 Shadow damage every 2 seconds to nearby raiders. Resistible (partial or full) Prayer of Shadow Protection is helpful
Shadow Bolt Volley - This hits raiders afflicted by Shadow Mark for 3200 shadow damage
Dead Side Adds
Spectral Trainee
CC that works - Kidney Shot, Cheap Shot
HP 5000
Arcane Explosion - 500 damage 30 yard range can be resisted
Spectral Death Knight
CC that works - Kidney Shot, Cheap Shot, Disarm
HP 19,000
Hits for 1500
Whirlwind - Approx. 1700 damage
Sunder Armor - Reduces armor by 2950 per Sunder. 25 sec duration. Stunlocking and disarming prevents Sunders
Cleave - 2500+ Physical damage to target
Mana Burn - Bolt that burns mana
Spectral Rider
CC that works - None
HP 10,000
Hits for 1500
Unholy Aura - 400 Shadow damage every 2 sec
Drain Life - Siphons 600 hp per tick, kick to interrupt
Spectral Horse
CC that works - None
HP 30,000
Hits for 2000
Stomp - PBAoE. Hits for 300 and snares 60% for 10 sec
Role Specific Tasks
Tanks
Live side tank balance when to break a CC vs new wave spawning.
Careful when moving while tanking Gothik in P2 as he can start chain shadow bolt spam if you move out of melee too much.
Melee DPS
Rogues - Use stuns as needed to reduce raid damage taken from Spectral Death Knight
Interrupt Lifedrain from Spectral Rider
Caster DPS
Single target DPS.
Avoid breaking CC.
Healers
Priests - Shackle on live side to CC Unrelenting Death Knight if tanks busy
Tanks will get weaker the longer they tank Gothik so bubbles and heals need to adapt.
Four Horsemen
The Four Horsemen fight is considered one of the hardest in Classic. It is not a DPS race and if done correctly most of the healing will go to the tanks. The fight does get easier as the raid clears horsemen but the initial phases, including the pull, require a lot of co-ordination. Healers move on their own cycle, independent of their tank or the DPS.
All DPS should use a GFPP and a SPP before the pull and as needed, until Thane Korth'azz is dead. The guide assumes 8 tanks, 12 healers and the rest DPS.
Each of the four horsemen puts out an aura, healers will aim to never get more than 3 stacks while DPS will get 3 and tanks will aim for 3 but may end up with 4 if taunts resist.
The initial goal will be to kill Thane Korth'azz and Highlord Mograine, which will be pulled to the left and right side of the door. Due to the Meteor mechanic, the DPS team will want to move in and out to him as a group to prevent deaths and not leave until the next shift is there to relieve them. Do not move out until they are there as leaving the tank and healers alone will kill them and lead to a wipe.
DPS will be split into 4 teams at the start of the fight. Team one will start with Thane Korth'azz, team two on Highlord Mograine while teams three and four will stay in the safe zone (middle of room near stairs). After the 3rd marks go out team three will move to Thane Korth'azz to relieve team one which will head to safe zone while team four head over to Highlord Mograine and team two will move to the safe zone.
After the 6th marks, team two will move to Thane Korth'azz letting team three return to the safe zone and team one will go to Highlord Mograine and team four will head to the safe zone.
While DPS are in the safe zone they should bandage and use potions (GFPP).
So the DPS will cycle between the first two bosses until these are dead, at which point the shades of the bosses remain (and the mark still goes out so stay clear).
Healers will be split into 3 teams: red, blue and green with 4 healers assigned to each color and one of each color will be with each tank initially. They will move in a clockwise rotation from boss to boss, so after mark 1 goes out all the healers in the red team will rotate to the next boss. Then after the 2nd mark goes out blue will move and after 3rd mark green will rotate.
Tanks will want to rotate in the same cycles as DPS, however there will also be 4 tanks cycling on Lady Blaumeax and Sir Zeliek using the same beats as the DPS. If you get a taunt resisted the departing tank will need to stay and wait for the new tank taunt to refresh.
After the first two horsemen die the fight gets easier, but slower. Instead of cycling to the dead horsemen all teams will cycle to the safe zones to wait for stacks to drop. Due to Sir Zeliek's mechanic melee DPS will not cycle in at all.
The following list shows one full cycle example of the fight. Each mark is 12 seconds.
Pull - DPS team 1 on Thane Korth'azz. DPS team 2 on Highlord Mograine
Mark 1 - Red team healers cycle.
Mark 2 - Blue team healers cycle.
Mark 3 - Green team healers cycle. DPS team 3 moves to Thane Korth'azz. DPS team 4 moves to Highlord Mograine. DPS teams 1 and 2 move to safe zone.
Mark 4 - Red team healers cycle.
Mark 5 - Blue team healers cycle.
Mark 6 - Green team healers cycle. DPS team 2 moves to Thane Korth'azz. DPS team 1 moves to Highlord Mograine. DPS teams 3 and 4 move to safe zone.
Mark 7 - Red team healers cycle.
Mark 8 - Blue team healers cycle.
Mark 9 - Green team healers cycle. DPS team 4 moves to Thane Korth'azz. DPS team 3 moves to Highlord Mograine. DPS teams 1 and 2 move to safe zone.
Mark 10 - Red team healers cycle.
Mark 11 - Blue team healers cycle.
Mark 12 - Green team healers cycle. DPS team 1 moves to Thane Korth'azz. DPS team 2 moves to Highlord Mograine. DPS teams 3 and 4 move to safe zone.
Mark 13 - Red team healers cycle.
Mark 14 - Blue team healers cycle.
Mark 15 - Green team healers cycle. DPS team 3 moves to Thane Korth'azz. DPS team 4 moves to Highlord Mograine. DPS teams 1 and 2 move to safe zone.
Mark 16 - Red team healers cycle.
Boss Abilties
All of the horsemen shield wall at 50% and 20% hp for 20 seconds.
Each horseman marks everyone within 70 yards every 12 seconds. Each stack does damage and refreshes it's 75 second timer. Each mark reduces threat of all targets by 50%.
Mark 1 - 0 dmg
Mark 2 - 250 dmg
Mark 3 - 1000 dmg
Mark 4 - 3000 dmg
Mark 5 - 5000 dmg
Mark 6 - 6000 dmg
Mark 7 - 7000 dmg
Mark 8 - 8000 dmg
Thane Korth'azz
HP 590,000
Meteor - 20 yard range cast ever 12 second does 15750 fire damage spread over all targets within 8 yards or targeted player.
Highlord Mograine
HP 530,000
Righteous Fire - 25% proc chance on melee hit of 2100 - 2700 fire damage and dot for 4800 all reducable through fire resist gear. (200+)
Lady Blaumeax
HP 290,000
Void Zone - 45 yard range cast every 12 seconds does 4500 shadow damage a tick and persists for 90 seconds. Cast under random player move to avoid.
Sir Zeliek
HP 230,000
Holy Wrath - Cast every 12 seconds. Does 600 holy damage and jumps to another target within 5 yards, doubling in damage.
Role Specific Tasks
Tanks
Communicate Taunt fails (use trinket on first taunt).
Use cooldowns if you need to wear a 4th or 5th mark.
When cycling away from Thane Korth'azz, move after Meteor goes out if not part of normal DPS cycle.
The horsemen can be disarmed.
Melee DPS
Use dps cooldowns early in fight
Understand each horsemen's ability and how to position.
Move as part of group for Thane Korth'azz.
Use healthstones and protection potions early in fight to assist in killing first two bosses.
Bandage while in safe zone.
Ranged DPS
Use dps cooldowns early in fight
Understand each horsemen's ability and how to position.
Move as part of group for Thane Korth'azz (yes hunters too).
Use healthstones and protection potions early in fight to assist in killing first two bosses.
Bandage while in safe zone.
Healers
Highlord Mograine's tank will need the most healing.
Understand each horsemen's ability and how to position.
When cycling away from Thane Korth'azz move after Meteor goes out.
Understand when raid needs healing (Thane Korth'azz)
Heal only tanks and healers mostly.
Sapphiron
The guardian of Kel'Thuzad's chambers is Sapphiron, an undead frost dragon. This encounter is an endurance fight relying on raiders bringing frost resistance gear and using Greater Frost Protection Potions. Casters will want between 100 and 150 frost resist while melee will want 200 to 250.
The fight consists of two phases, which alternate. Initially, Sapphiron will be on the ground and will be tanked facing the stairs. Melee will stack on her flanks with healers and casters spreading out around the room. Odd raid groups will be left and evens will be right. After 45 seconds she will take flight, launching Phase 2 of the encounter.
During Phase 2 she will randomly Icebolt 5 players which will damage them and anyone near them but also converts them into a line of effect blocker. It's important for everyone to remain spread out but aware of the closest Iceblock to them. After the 5th Icebolt goes out the raid will quickly hide behind one of the 5 iceblocked raiders, keeping the Iceblock between themselves and the center of the room. Sapphiron will cast her Frost Breath there and anyone not behind an Iceblock will most probably die. The breath also removes the Iceblock effect signaling the end of the phase, the raid will spread out again to their phase 1 position.
Following flight phases occur 67 seconds after landing.
Be aware of the Blizzards that move through the room (avoid) and the Life Drain she casts (decurse).
Boss Abilties
Frost Aura - Raid-wide cast every 2 seconds, dealing 600 damage. Reduced by frost resistance.
Life Drain - Cast every 24 seconds, drains 2000 life per tick healing Sapphiron for 5k. Decurse.
Blizzard - Slow moving area effect doing 4000 frost damage per tick. Avoid.
Icebolt - Cast during Phase 2 on 5 targets, doing up to 3375 frost damage to target and anyone within 10 yards. Turns target into iceblock.
Frost Breath - Does up to 125,000 frost damage to raiders not behind an Iceblock. Always cast from the center of the room.
Role Specific Tasks
Tanks
Minimal frost gear needed.
Melee DPS
Phase 1 - Remain at her flanks but avoid Blizzard at all costs.
Phase 2 - Spread out quickly to avoid chaining Icebolt damage.
Bandage when behind the iceblock.
Ranged DPS
Mages - Decurse the Life Drain.
Spread out around edge of room.
Phase 2 - Avoid clumping until 5th Icebolt has gone out.
Sapphiron is immune to ice effects.
Healers
Spread out around edge of room.
Phase 2 - Avoid clumping until 5th Icebolt has gone out.
Iceblocked players are immune to damage.
Kel'Thuzad
The final encounter in Naxxramas is a challenging 3 phase fight so please read this carefully.
Some frost resist gear should be worn by the raid to reduce raid wide damage from Frostbolt. A Greater Frost Protection Potion will be used by all before start and again as needed.
Phase 1 consists of waves of undead that move towards the raid that will be clumped near the center of the room. During this 5 minute phase it's important not to agro extra undead that appear around the edges of the room as this just makes the encounter harder. Pets need to be kept under control. Ranged will be responsible for picking off the Soldiers before they reach the raid and burning down the Soul Weavers. Melee will be working on the Unstoppable Abominations.
As Phase 2 starts KT will become targetable. The main tank will want to position him in the middle of the room while the raid finishes off any remaining targets from phase 1. Ranged and healers will want to spread out at least 10 yards to avoid chaining the Frost Blast or getting hit by the Mana Detonation. Melee will be in three teams, stacked on top of each other, at max melee range in locations A, B and C. It's important the melee in each team interrupt the Single Frostbolt when it's their teams turn. One cast will kill a tank.
Off tanks will be near the throne, ready to pick up KT when the main tank is charmed.
There is a lot going on in this fight and raiders need to be aware of their surroundings so as not to die to Shadow Fissure.
Phase 3 starts when KT's life reaches 40% and calls out for help from the Lich king who sends 5 Guardians of Icecrown. Three of these can be Shackled at a time, the remaining 2 will need to be offtanked. Do not shackle a 4th or they will all break. They grow in power as raid members die or even when they switch targets. They will need to be off tanked for the rest of the fight. Given the punishing mechanics at this point the goal is simply to survive long enough to kill him.
Boss Abilties
HP 3,150,000
Immune to taunt
Hits 3k on plate
Frostbolt single - 2 second cast. Up to 11,000 frost damage on top threat. Must be interrupted. Cannot be resisted.
Frostbolt multiple - 15 second recast. 2,750 to 3,500 frost damage on everyone in raid. Cannot be interupted. Can be resisted.
Chains of Kel'Thuzad - 60 second recast. Charms 5 raiders including Main Tank and wipes all threat. Charmed raiders increase size and damage by 200% and healing by 500%. Will buff and heal KT. CC charmed raiders.
Mana Detonation - 20 second recast. Targeted mana user will explode after 4 seconds, damaging other raiders within 10 yards (does not hit affected raider) and reducing mana by 50%.
Shadow Fissure - 10 second recast. Summons red fissure under random raider dealing 137,500 shadow damage after 3 seconds. Move to avoid.
Frost Blast - 30 second recast. Hits random raider and anyone within 10 yards chaining onwards. All affected targets are unable to act for 5 seconds and take 130% of their HP in damage. Targets must be healed within 4 seconds.
Phase 1
Soldier of the Frozen Wastes
HP 2000
120 will spawn
Dark Blast - Melee range does up to 3100 shadow damage to all in area.
Unstoppable Abomination
HP 100,000
14 will spawn
4k melee on plate
Mortal Wound - 5k on plate and applies stacking 10% healing reduction
Soul Weaver
HP 70,000
14 will spawn
Wail of Souls - 6375-8625 shadow damage and knocks target back 30 yards, will hit up to 3 targets. Will only use once it reaches it's primary agro target.
Phase 3
Guardian of Icecrown
HP 3,150,000
Can be taunted
5 will spawn
3 can she shackled at any given time.
Blood Tap - Self buff stacks up to 99. 15% damage increase. Gains stack on target switch or raider death.
1000 damage to plate initially.
Role Specific Tasks
Tanks
Phase 1 - Pick up Unstoppable Abomination while DPS burn them down.
Phase 2 onwards - Main Tanks will always want to stand on the tank spot to avoid being chained by abilities.
Off tank - Be ready to pick up KT when MT gets charmed each minute.
Phase 3 - Do your best to keep the Guardian of Icecrown locked down.
Save shield wall for end phase KT tanking.
Melee DPS
Phase 1 - Assist in killing Unstoppable Abomination.
Phase 2 onwards - Stack with your team at max melee range.
Interrupt when it's your teams turn, do not skip this.
Be on the lookout for Shadow Fissure, back up to avoid.
Stop DPS during tank swaps to not die, but keep interrupting.
Ranged DPS
Phase 1 - Watch for Soldier of the Frozen Wastes, they only have 2k HP but must die before they reach the raid.
Burn down Soul Weavers before they reach the raid.
Phase 2 - Spread out around the edge of the room once all the trash is dead. Keep 10 yard range at all times.
Always be looking for Shadow Fissures, they are easy to avoid.
Mages - Use detect magic on KT to see if he receives buffs from charmed raiders.
Mages - Sheep charmed raiders quickly.
Warlocks - Fear can also be used to CC charmed raiders.
Healers
Phase 1 - If not healing, it's fine to wand trash.
Phase 2 - Spread out keeping 10 yards apart, try to remain in a circle around middle of room to stay in range of most of the raid.
Priests assigned to melee group - If your group is struck with Frost Blast use group heal to keep them from dying and make sure you remain close enough for this to be in range.
Always be looking for Shadow Fissures, they are easy to avoid.
Phase 3 - Assigned priests will Shackle 3 of the Guardian of Icecrown.
There are times the whole raid will take significant damage when a Frostbolt Volley goes out.
 Anub'Rekhan
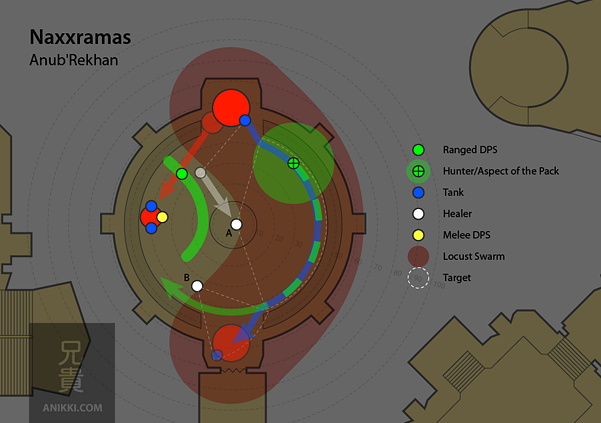
 Grand Widow Faerlina
 Maexxna
 Patchwerk
 Grobbulus
 Gluth
Gluth Thaddius
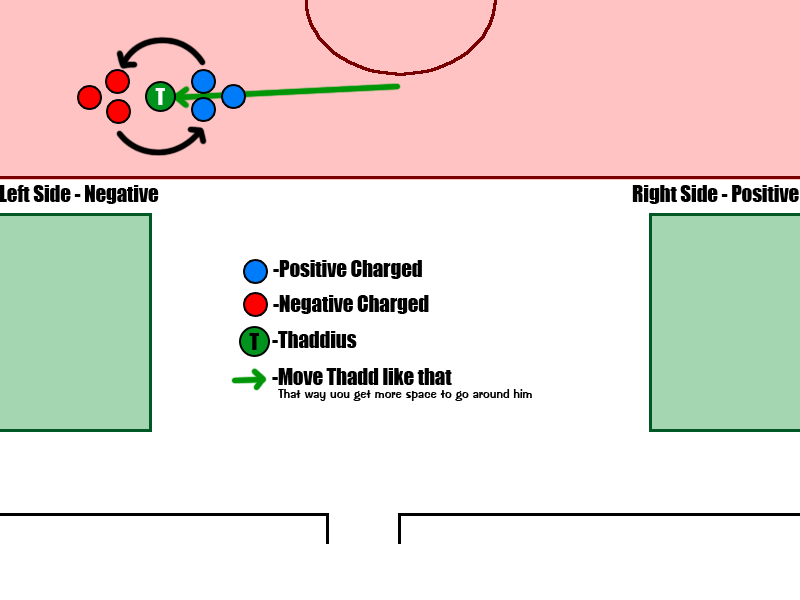
 Noth the Plaguebringer
 Heigan the Unclean
 Loatheb
 Instructor Razuvious
 Gothik the Harvester