Check out the Nature Resist Guide. All melee and hunters are expected to reach well over 200 NR buffed, bring as much as you can without breaking the bank. Tanks, healers and casters are not required to farm NR.
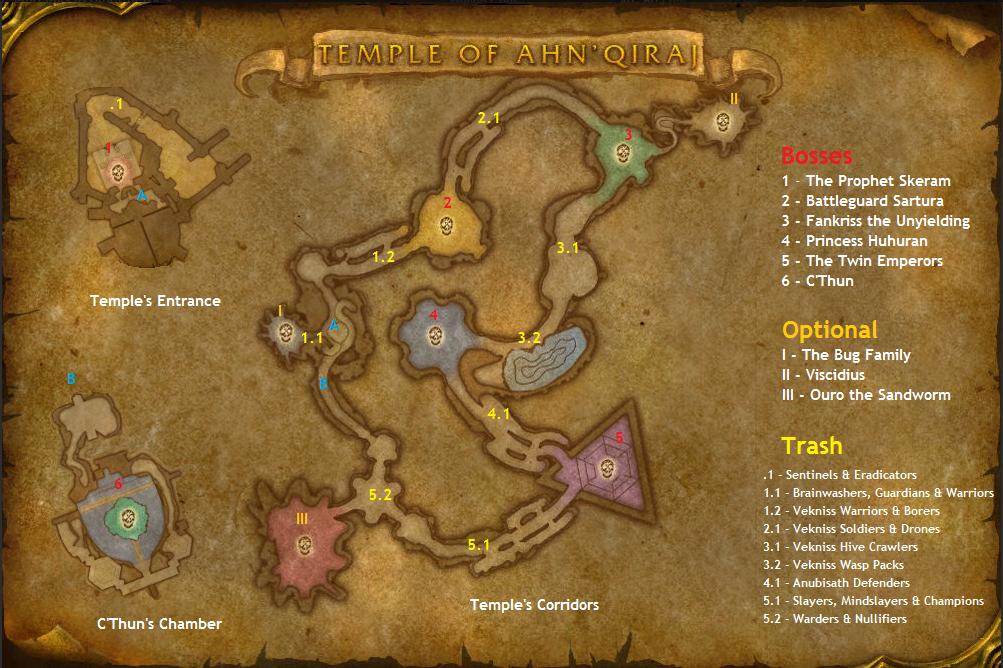
The focus of this guide is to assist the raid in overcoming the challenges of AQ40 trash and boss fights. It will not go into details around how the loot system works or how faction gain ties into the raid progression as these things are covered elsewhere.
All raiders are expected to bring consumables to each raid. The numbers below are for progression.
As only 6 of the bosses are mandatory, a fast clear requires only clearing bosses as follows:
A full clear would look more like this:
Packs of 4 Anubisath Sentinels are the first encountered trash in AQ40. Each Sentinel has a random skill and upon death that ability is passed to the others as well as restoring 50% of their life. This means the weakest stills will be tackled first and all DPS must focus on the same target. Detect magic should be cast on all of them. Kill order as listed below.
These drain mana from the closest 16 casters. If they ever reach 100% they discharge a massive nature nova up to 30 yards. If needed warlocks, priests and hunters can drain and burn mana.
Qiraji Brainwasher and 2 Vekniss Guardian in each pack. Kill the brainwasher first and tank the guardians under an overhang so the knock up doesn't cause fall damage.
Qiraji Brainwasher Abilities
Vekniss Guardian Abilities
There are two types of bugs in the tunnel: Vekniss Soldier and Drones. The challenge is managing the threat on the drones while killing them in clumps.
The Warriors have no special abilities apart from spawning some non elites on death, the Crawlers use the following abilities which should be countered.
Hunters will want to pull these out of the room near Huhuran. A pack will consist of Vekniss Wasps, Vekniss Stingers and Qiraji Lasher. The Wasps will use an ability called Itch which after 10 seconds applies a debuff called Vekniss Catalyst which slows and damages the player but also makes them vulnerable to the Charge from the Vekniss Stinger. The Lasher will lose agro randomly and run around attacking players, but can be stunned and taunted. Quick removal of the Vekniss Catalyst is needed to stop raiders dying to random charges.
There are 5 of these and they should be engaged individually as they are amongst the hardest trash in the zone. Like the other Anubisath they have a random set of abilities that must be identified and adjusted to.
The will summon Anubisath Warriors and Anubisath Swarmguards which should be offtanked. Swarmguards should be tanked facing away from the raid as they cleave and the Warriors should be tanked against a wall to avoid the knock back from their Uppercut.
These packs should be pulled back into Twin Emperors room. The makeup of the pack is random so the raid will need to adjust. Mindslayers should die first - they are immune to taunt so manage threat; and they should also be removed from raid before they die to avoid the mana burn fear from hitting many raiders. Tanks holding Slayers will want their backs to a wall, and hunters should be ready to tranquilize them.
Qiraji Champion Abilities
Qiraji Slayer Abilities
Qiraji Mindslayer Abilities
The last few packs are made up of 1 Warden and 2 Nullifiers. The Warden will have random abilities as well as a Fire Nova. The Warder should be pulled to the side while the raid burns down the Nullifiers making sure they never cast a nullify.
Fire Nova - Deals fire damage to all targets near the Warder.
Entangling Roots & Fear
Dust Cloud & Silence
Obsidian Nullifier Abilities

The raid will want to spread out over all three platforms, leaving an off tank and a rogue on each platform with the main melee group at the center and the ranged and healers on the topmost platform. Every 25% life Skeram will create two clones which will need to be agroed and tanked. The clones will need to identified and should be focus killed by ranged and the assigned melee before DPS returns to the true Skeram. During his last split at 25% the real Skeram should be focused as his clones will despawn once he is killed. Mages will need to be quick to sheep the raiders who get charmed. Rogues and warriors should interrupt the arcane explosions.
When Skeram blinks he should be picked up and pulled back to the middle platform.
Drain mana can be used on the real Skeram at the start of the fight to identify the clones from the real one after splits, as the clones always have full mana.
Greater nature protection and arcane protection potions can be used to help with damage while the encounter is learnt.
Skeram will only cast Arcane explosion if there are 5 or more raiders in melee range, however as cast time can be slowed and the spell can be interrupted it is preferred to simply dps him down and interrupt his casts.

Based on the order the bugs are killed in, specifically which bug is killed last dictates the loot for this encounter. The loot drops can be seen below.
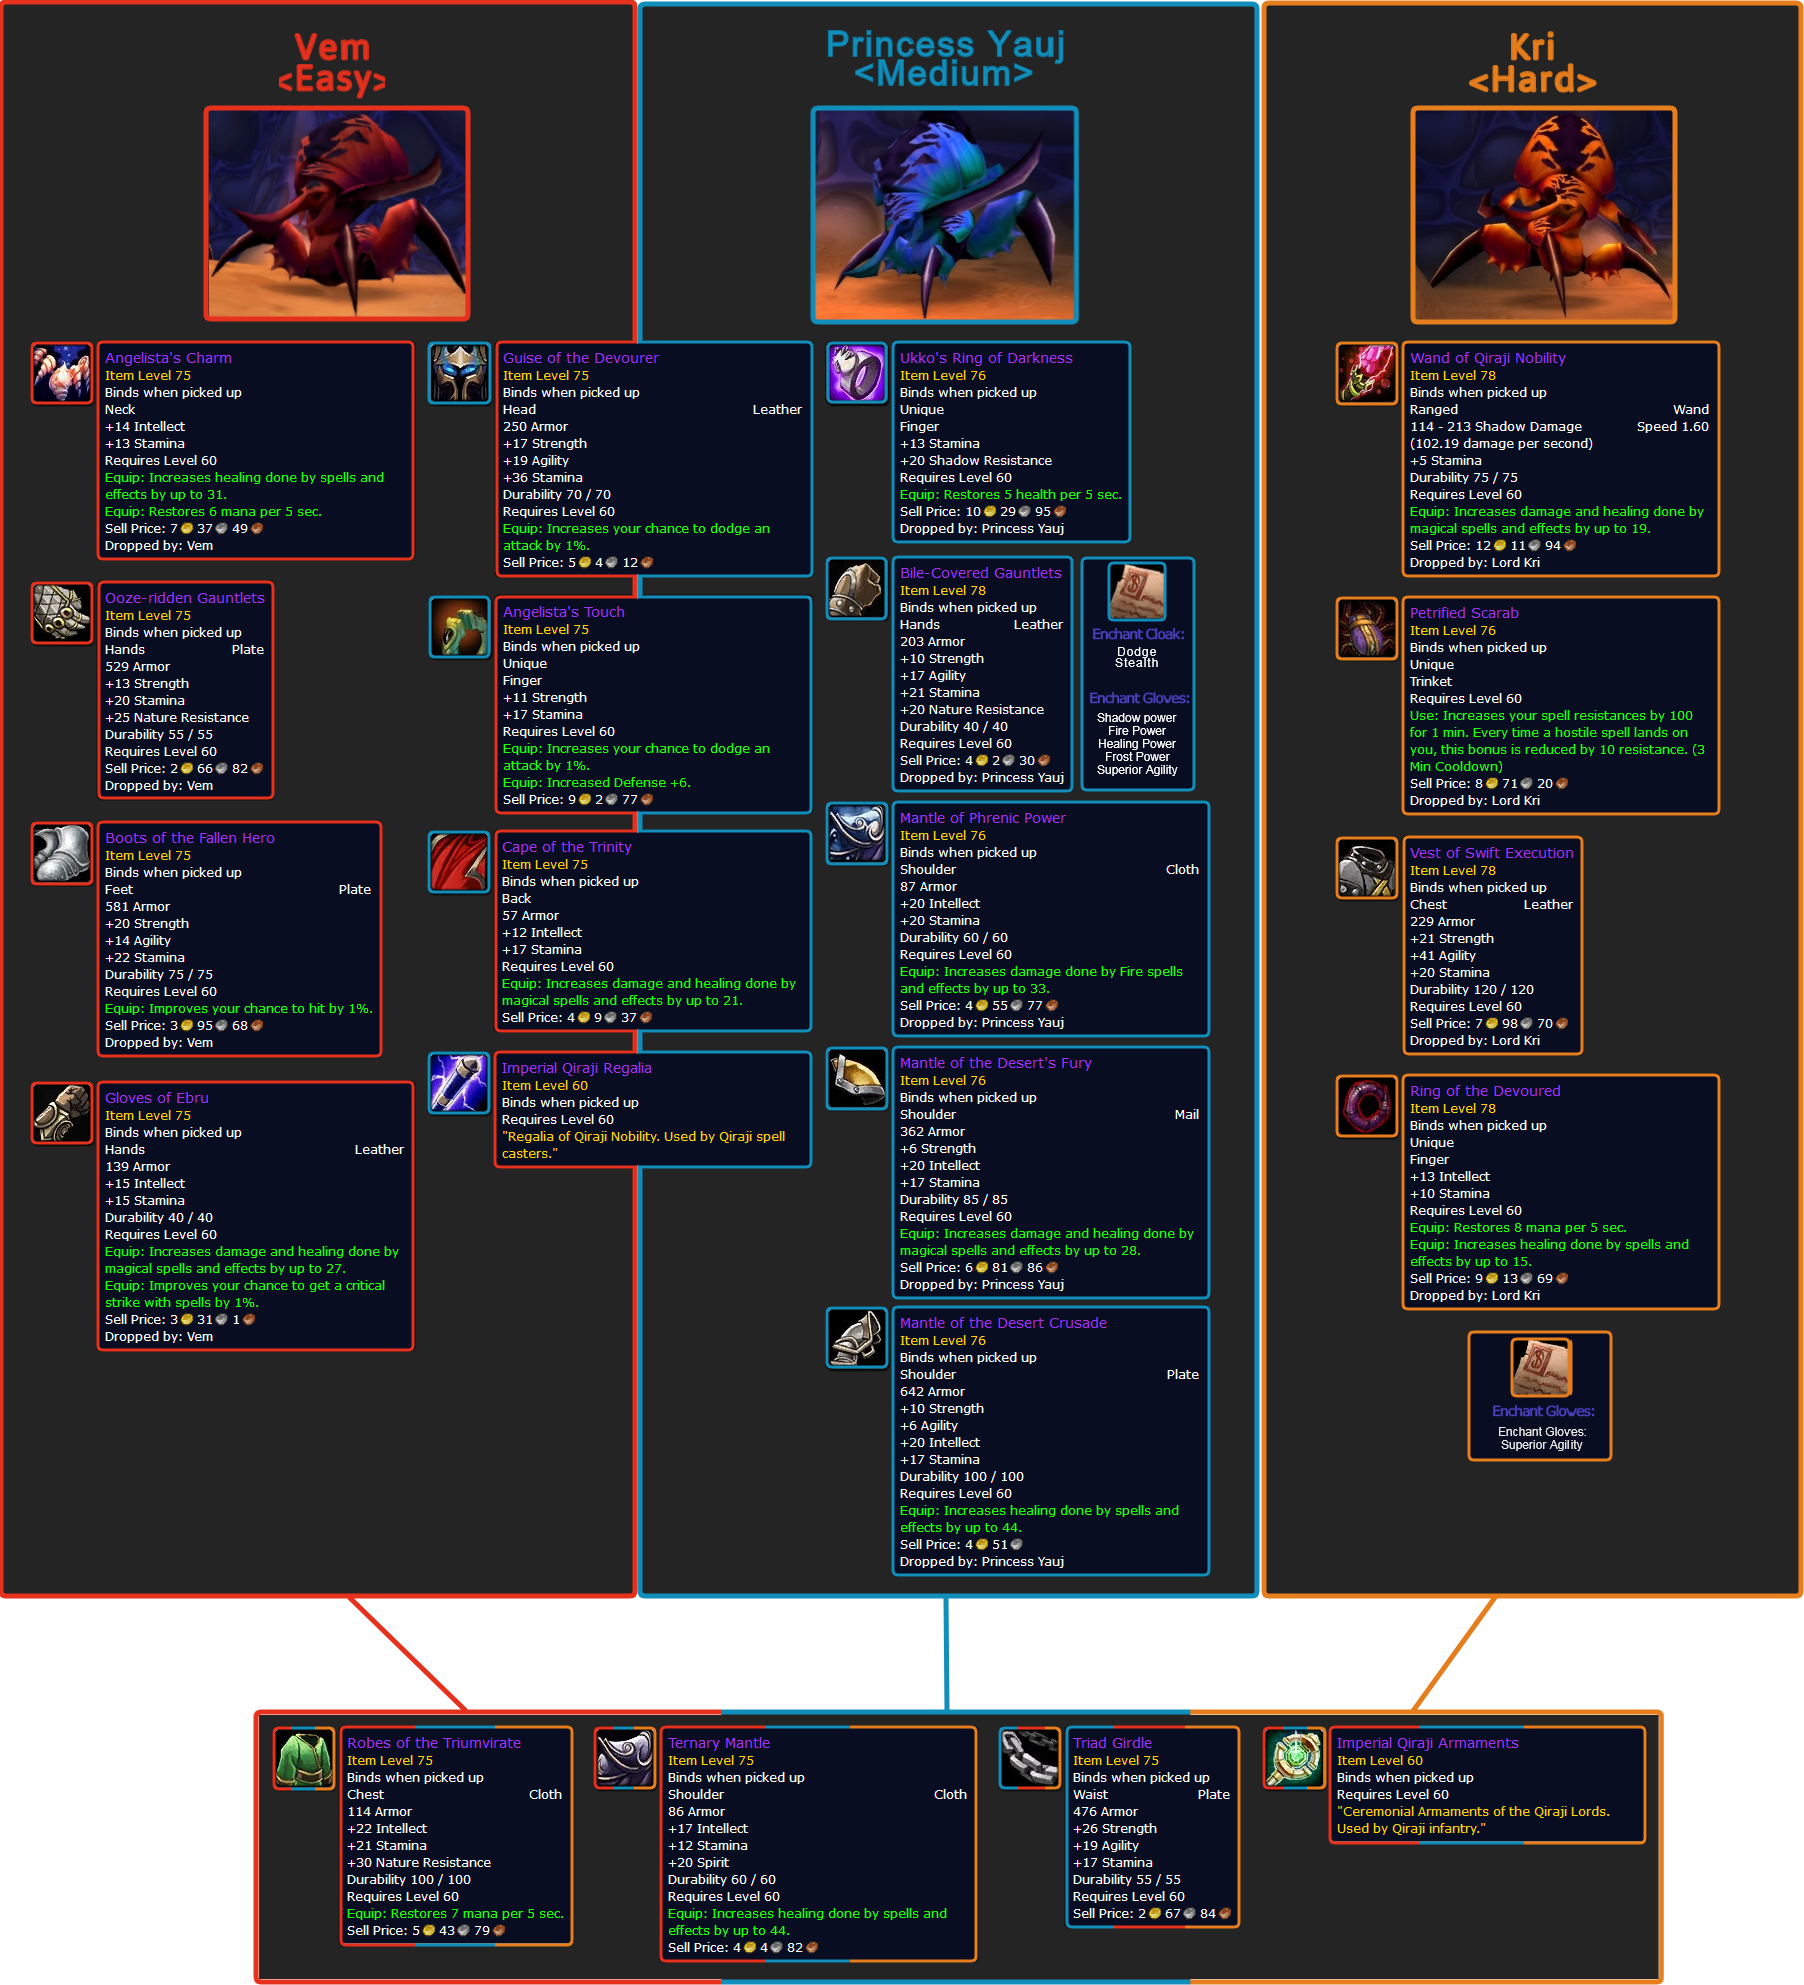
The easiest order is Lord Kri -> Yauj -> Vem. If you want loot from Yuaj the order is Kri -> Vem -> Yauj and the hardest order is Yauj -> Vem -> Kri. Regardless of the order the bugs will need to be tanked far apart. Each bug has an on death affect, the worst of which is from Vem who doubles the attack speed and special ability usage of the other bugs.
Vem will need to be tanked in alcove so only the tank is his line of sight to avoid him charging the raid until he is ready to be killed.

Tank on Yauj will need to have a fearward up so keep dwarf priests on this tank. Her heals will need to be interrupted.

Kri isn't too hard to tank, it's the constant dispelling of his poison volley that becomes the issue.

Sartura and her guards have similar abilities however hers do considerably more damage than those of her guards. Stuns are very useful in this encounter, though diminished returns are a factor. They are effective on all of them, however cannot be applied while they are whirl winding. Rogue Kidney Shot is especially useful as it shares a different diminished returns stack to other stuns. Identify magic allows raiders to see when a stun can be applied. Periodically the guards will temporarily lose agro and chase random raiders for 5 seconds before returning to the highest threat target. Use of limited invulnerability potions can really help when in a tight spot as they move faster than raiders can. Focus down her guards one at a time quickly, coordinating stuns to keep them in position for DPS to apply.
Avoid being near the tunnel leading deeper into AQ as the knockback could send a raider into an area and give us all flashbacks to Onyxia Whelp pits.
Cloth wearers should stand well clear of her.

This encounter requires two tanks on the boss and 3 offtanks to pick up adds from the 3 bug tunnels around the room. Randomly raiders will be ported to these tunnels and rooted for a while. The adds need to be picked up by a tank and held until Fankriss + spawn are dead. They can be snared and feared but not rooted.
The most important part of the fight is the Spawn of Fankriss which hits hard and needs to be stunned / tanked and killed in under 20 seconds. All DPS need to switch to it and kill it quickly.
Fankriss applies a stacking heal reduction on all targets in front of him. Tanks must switch tanking him at 3 to 5 stacks making sure they are far enough apart so both of them do not receive the stacks.
Must be stunned and killed as soon as possible.

This boss rotates through 3 phases until killed. He can be reset by having the raid run out of the room if an attempt is going poorly. Nature resist gear and frost based weapons and wands are helpful in this encounter and the use of nature protection potions also help.
In the first phase Viscidus needs to be struck by as many frost based abilities as possible. The damage of the ability doesn't matter - only the number of impacts count. Non mage casters will want to use a fast frost wand, while mages will cast low level frost bolts. Melee can help if they have Coldrage Daggers or Darrowspike (this needs to be confirmed) and use of frost oil will help as well.
He must receive enough frost hits within the allotted time to be pushed to the next phase or he will revert.
Once frozen he needs to be shattered, again this needs to happen quickly or he will thaw. To achieve this he needs to be struck by as many melee hits as possible in the time allowed. Even casters will want to run up and melee.
Viscidus shatters into up to 20 "Globs of Viscidus" in a circle around the room. These Globs will begin to move towards the center of the room, slow at first, but continuously and steadily gathering speed. Each glob has around 10 - 15k health and represents 5% of his total life. Each glob must be killed, or damage done to it will not matter. They cannot be slowed or stunned. Once they reach the center, Viscidus will be reformed (missing whatever glob %hp you've killed) and he will return to the first phase.

During phase 1, lasting until 30% life, the raid tanks and melee should be in a tight ball near boss while the ranged dps and healers spread out around the room keeping distance to avoid spreading Noxious Poison. Hunters use of tranquilizing shot is critical and she should never remain in frenzy long enough to put out a Poison bolt volley. Her Wyverns Sting ability will hit 10 raiders in melee at random, including pets and should not be dispelled unless it's on a tank as removal does 3000+ nature dmg. She cannot be taunted so the two tanks should work to pass threat after gaining around 10 stacks of Acid Spit.
Once she reaches 30% life she will enrage and the fight becomes a DPS race. All big cooldowns should be saved for this phase. She will cast constant Poison Bolts every 2 seconds. All melee should use a Greater Nature Resistance potion and also Barov Peasant Callers at this point. Priests in the melee groups will want to be casting group heals on Cooldown. As melee will be wearing a lot of Nature Resistance gear for this fight, the bulk of the damage will come from the casters.
She has a hard enrage timer of 5 minutes.
The Dwarven racial skill Stoneform will make the raider immune to Huhuran's poison spit for 8 seconds, while still being counted as one of the 15 soaks.
She has a number of abilities that must all be dealt with for a successful kill.
There is a disagreement if tanks should aim for high nature resist (300+) or focus on having high health pools. It is recommended to have nature resist gear prepared.

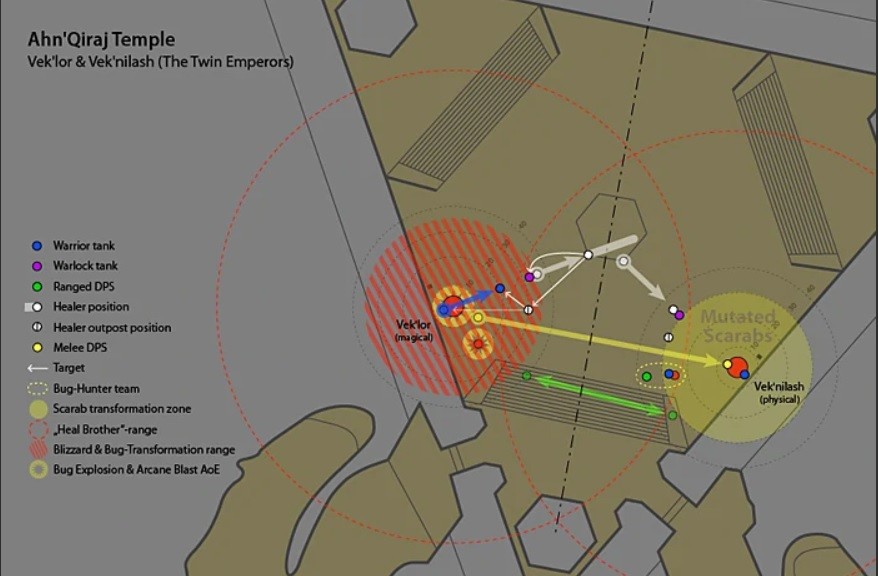
This encounter involves several interesting mechanics. Two warlock tanks as well as two regular tanks are needed. The two bosses need to be pulled and positioned near the torch on their respective sides as it serves as a good marker. Periodically the twins switch places via a teleport, clearing their agro and staying stationary for 2 seconds. After that they agro on the closest raider which should always be a tank. On Emperor Vek'lor's side a warlock will work to pull agro off the tank and proceed to serve as tank for the rest of that phase. This is because the boss won't tolerate a melee in range and will need to be the target for all caster DPS.
Emperor Vek'nilash on the other hand is immune to all spell damage and will be the target of the melee and hunters. These will need to run across the room just before the switch is due to take place. While the casters will be doing the same on the stairs. Due to the shorter distance the casters will be primarily in charge of clearing the bugs.


Ouro has two modes he alternates between as well as an enrage phase. He will remain above ground for between 90 seconds and 3 minutes or until no one is in melee range, which can be caused by his sweep attacks. When he comes up on his first natural submerge window at 90 seconds, melee dps should move away from him as when he submerges he casts Dirt Mound Quakes. During the submerge phase raiders should spread out to avoid the quakes but keep together enough to receive heals and be ready for his emerge.
Once he re-emerges via his Ground Rupture he will knock all raiders close to him back and also use Summon Ouro Scarabs which should be AoE priority. When he reaches his berserk stage at 20% life his damage will increase and he will no longer submerge, but he will use both phase abilities at the same time. During the enrage phase it's recommended not to kill the adds but to fear or CC them and to focus on killing Ouro.
Positioning of the tanks is key to overcoming this encounter. Ouro can use a 180% frontal cone ability called Sand Blast on his highest threat target every 25 seconds which also wipes the threat of all targets hit by it. This means that tanks will be switching and off tanks must be careful to avoid being hit by the Sand Blast.
While above ground:
While submerged:
Enrage - During enrage Ouro attacks 150% faster and hits for 100% more damage. He also uses his Scarabs and Dirt Mounds ability without submerging. While not tanked he will cast projectiles doing 6,000 damage.
This strategy extends the mechanics of the fight above.
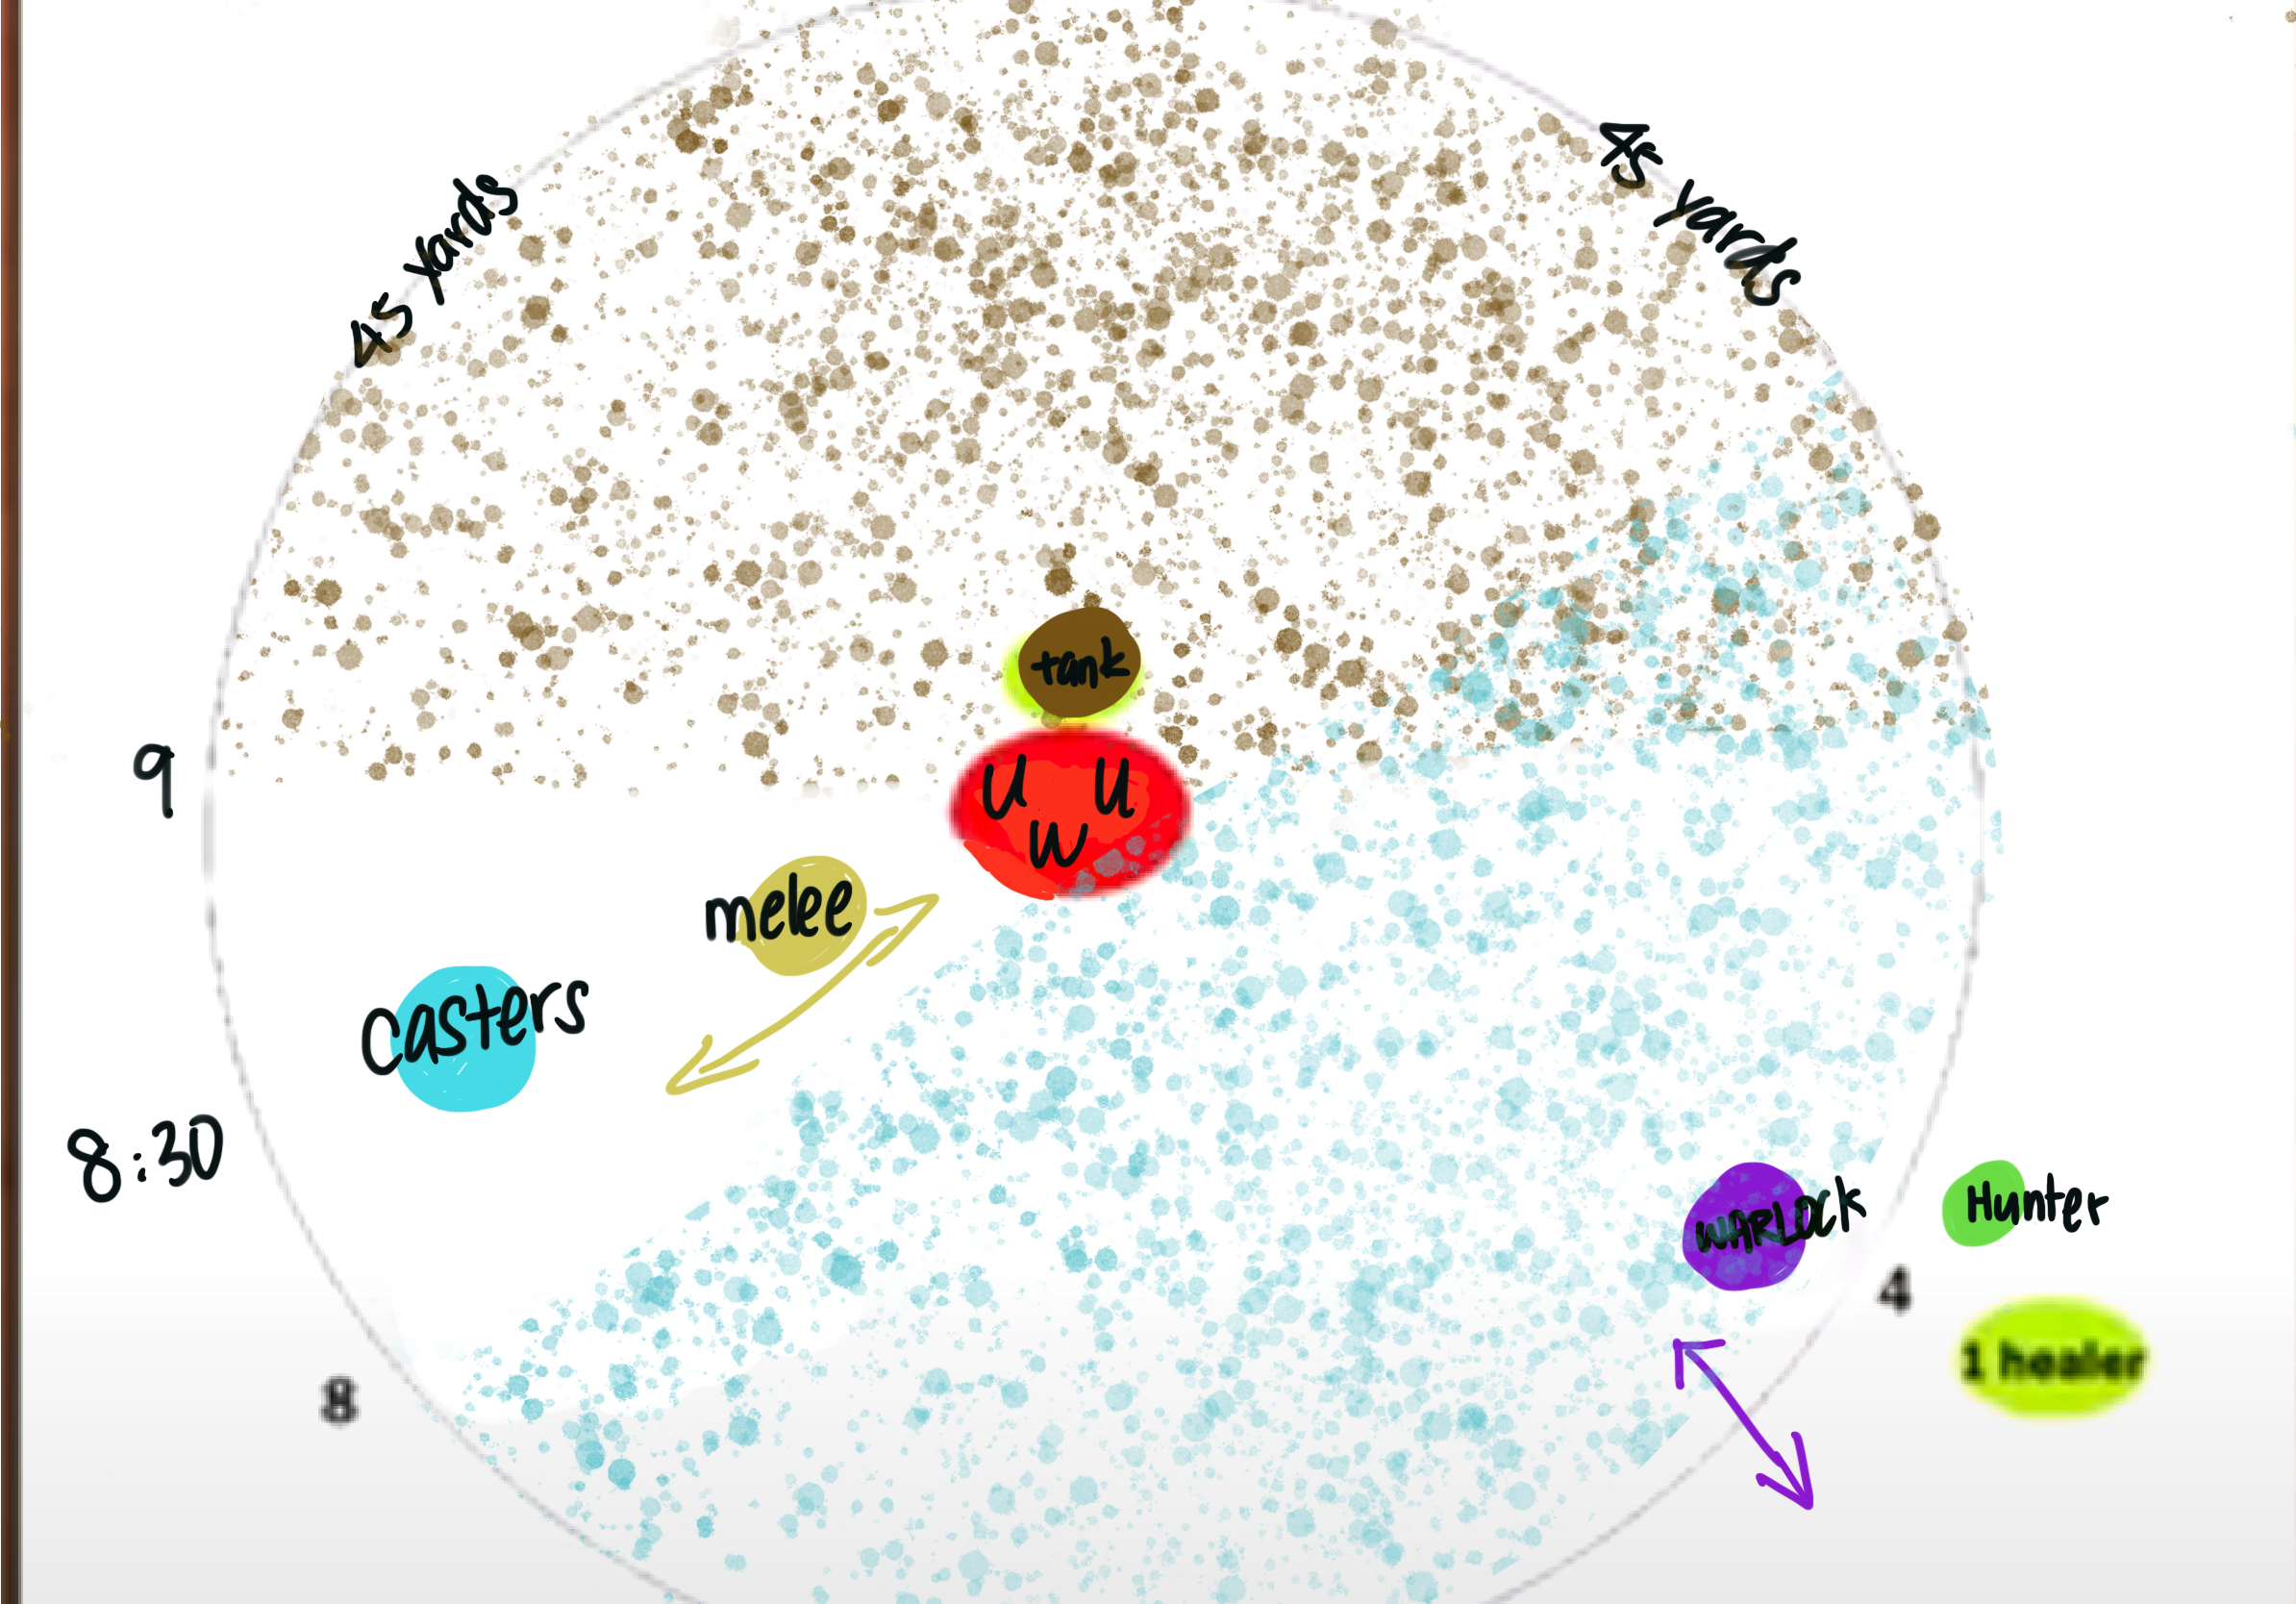
Ouro's sand blast is always cast on the highest threat target and has a range of 45 yards. The goal with this strategy is to have that person be a warlock, who will maintain highest threat throughout the fight. Each time the sandblast is cast the warlock will dance out of the 45 yard range meaning he maintains his threat. For the rest of the time the Main tank in melee will still be tanking the melee hits, but will be positioned so that the sandblasts targeted at the warlock will never hit him.
If the warlock is hit by a blast his threat will be wiped and the Main Tank will be the target of the next sandblast at which point the strategy reverts to the standard one. The more cycles run successfully with the warlock maintain threat the less tanks we lose from the threat lineup meaning even if the warlock is struck half way we still have all our normal tanks to take consecutive blasts preventing DPS from becoming the target of the blast and having it turn on the raid.
As we want to make sure both the top threat melee tank and the warlock cones of sandblast do not include other raiders the raid as a whole needs to be in a very small slice (see the image). During the 20% enrage phase it may be necessary for the raid to move out of that small slice.
The 8:30 point on this dial points towards the door the raid comes in from.

Congratulations, you've reached C'thun!
This encounter has many mechanics that all raiders must be aware of and react to. Key aspects are how the raid enters the room and where raiders can stand and how they move during phase 1 and 2. Mistakes can quickly lead to deaths and even a portion of the raid force down can cause issues that compound to failure. To add to this, each kill requires use of consumables such as everyone having a greater nature resistance potion before the encounter starts. Please understand every aspect of this fight and what actions are expected and ask questions if you're still unsure.
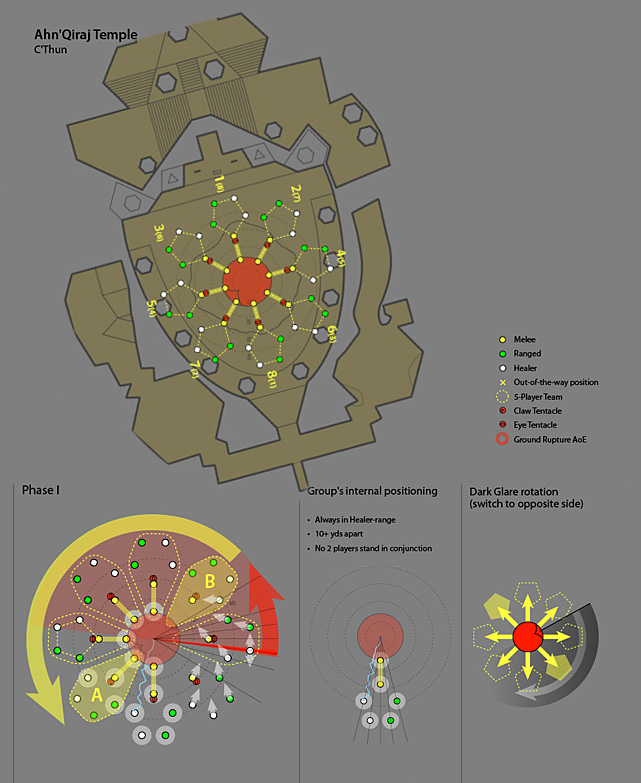
Movement into the room is critical to success. C'thun casts Eye Beam every 3 seconds at random raiders in the raid. This ability can jump to other raiders if they are closer than 10 yards and when it does its damage increases rapidly until it's killing raiders outright, which usually happens after the 3rd jump. Only on the initial pull is this ability guaranteed to hit the same raider twice (the first one he agroes on). That means within 6 to 9 seconds the entire raid must enter the room and assume their positions. After that point random bad luck could kill multiple raiders. Once in position all raiders must maintain this spacing for all of Phase 1.
Once in position all raiders can begin to damage the boss. Due to positioning there will be melee characters that cannot hit the boss. Every 45 seconds a ring of Eye Tentacles will spawn at the edge of the black ring. Avoid standing where they spawn as they knock back, and immediately mind flay random raid members. These can and should be interrupted and killed by the ranged and melee in the middle circle. The inner circle melee should keep damaging the boss.
Throughout the fight claw tentacles will also spawn which knock raiders away (and possibly close to other raiders). They should be killed but make sure to return to a safe distance before focussing them down.
C'thun will use Dark Glare every 45 seconds. His eye will turn red and the pupil will cloud over. He chooses a random initial direction. All groups near where he fixates will want to move away towards the side they are closer to, if right in the middle choose a side at will. Once safely away watch to see which direction he rotates and move accordingly, he will rotate 180 degrees clockwise or counter clockwise over 35 seconds. During the Dark Glare he does not cast Eye Beam so you do not need to maintain social distancing however eye stacks and claw tentacles keep spawning and should be killed by anyone who can. After he finishes all spacing must be in place and parties will find themselves on the opposite side of the room where they were before.
Once his life reaches 0 phase 2 starts. If all tentacles are dead raiders are removed from combat and should take this opportunity to drink/eat.
In phase 2 the raid will no longer need to be social distancing as strictly however it is important to keep similar places as in phase 1 for three reasons. By maintaining the spread raiders are always near where tentacles emerge, less raiders take damage from them emerging, can quickly engage them and also there are still eye beams being cast, this time be the Giant Eye Tentacles. These spawn every minute and have 36,000 HP. They can and must be interrupted or stunlocked as a single cast of an eye beam can kill many raiders. All forms of interrupt work. The regular Eye Tentacles are also still spawning every 30 seconds now and should be interrupted and killed.
As well as these there are now Giant Claw Tentacles that spawn that will need to be tanked as they melee for 1,500 on a tank and can thrash. If there are no melee in range they will submerge and emerge elsewhere doing damage again. They have 90,000 HP and will need to be killed but have the lowest priority.
C'thun is mostly immune to damage; to counter this immunity raiders who are swallowed into his stomach must kill the two flesh tentacles there. While in the stomach raiders will gain a stacking damage dot, which cannot be resisted but can be mitigated by using Greater Nature Resistance Potions. Tanks should leave the stomach immediately by standing on the center of the black platform.
Healers should stay and heal melee and ranged DPS in the stomach to prolong the period these can do damage to the Tentacles. Once a raider has between 5 and 7 stacks they should leave. Make sure to stand in the center of the platform when leaving and only one person may do so at a time.
Once both stomach tentacles are killed C'thun will enter a weakened state for 45 seconds. It is important to start debuffing him in advance of the weakened state. During this time no new tentacles will spawn and he can be damaged. It is important to do this when the Giant Eye Tentacles are dead or near dead so all damage can focus on C'thun. Any Giant Claw Tentacles up should be tanked but all damage should be focused on C'thun. Expect to drop him at least 50% on the first weakened phase. After the phase ends he will return to regular phase 2 mechanics and the raid should assume their positions.
Spawns every 45 seconds in phase 1 and every 30 seconds in phase 2.
Spawn every 5 to 10 seconds in phase 1.
Spawns every 60 seconds in phase 2, with a 30 second offset to the Giant Claw Tentacle
Spawns every 60 seconds in phase 2, with a 30 second offset to the Giant Eye Tentacle
Strong NR geared hunter can take point going into room and once in place feign death and change to dps gear
You will betray your friends.