Welcome to Zul'Gurub. The following guide seeks to assist in preparation for the raid. The 20 person raid force should consist of 3 tanks, 6 or 7 healers and the rest DPS - ranged DPS are more versatile.
There are 10 bosses of which 6 are mandatory for a clear and 4 are optional. Two of the optional encounters require trade skills to activate: alchemy and fishing. This guide will not go into detail on the faction breakdowns however a clear generally gets you around 3k reputation and it is recommended to hold off doing quest based faction turn ins till you reach revered and then focus on the classes that need it for trade skills first. There is a good guide here on faction.
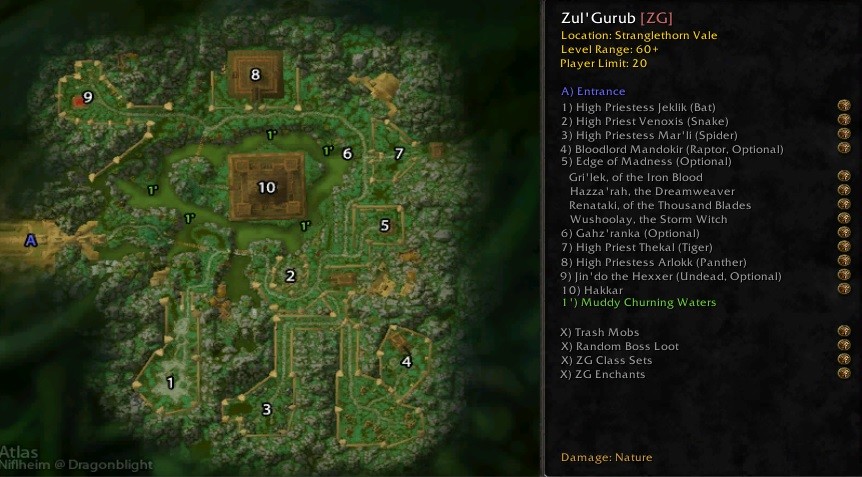
Anyone 58 or greater can enter Zul'Gurub making it an ideal place for aspiring raiders to get geared up in anticipation of harder raids.
As only 6 of the bosses are mandatory, a fast clear requires only clearing bosses as follows:
A full clear would look more like this:


Jeklik starts the fight in bat form. During this phase waves of non-elite bats spawn every 1 minute which should be picked up by an off tank and cleared. If possible the main tank should have a fear ward. Ranged and healers should stay at max range to avoid her silence.

Once she reaches 50% she will switch into troll form. Agro resets so allow the main tank time to regain it. She will cast a number of priest like spells - the greater heal she casts must be interrupted or she will heal for 25% of her life, her mind flay should also be interrupted if you have enough interrupts to spare. Her magic based DoT should be cleared. It's recommended that the tank move her continuously to avoid the fire patches being dropped by the flying bats. Noone should stand in the fire.
In phase one Jeklik uses the following abilities.
In phase two while in her human form


Venoxis is considered the easiest boss. Before pulling him clear the area. When engaged the tank should pull him to the fire while his 4 adds are pulled out of the room where the raid kills them using whatever CC they can to simplify the fight. Once the adds are dead the hunters, priests and warlocks siphon his mana and once it's all gone the melee dps can engage. Casters should conserve as much mana as they can in phase 1.

When he reaches 50% he will transform into a snake and his agro is reset. Melee DPS should avoid standing in the poison clouds he creates, letting the ranged DPS do the majority of the damage in this phase if necessary.
In human form he casts the following.
When he becomes a snake he casts the following.

Mar'li has two forms, which she switches between at will. When the fight starts she is in troll form, a priest should mind control the speaker next to her and use it to tank the boss while the raid clears the 4 adds.
Once the adds are dead the raid should form two groups with the melee near the tank fighting the boss and the ranged near a second tank clustered in closely near max range to avoid the Poison Bolt Volley.

She will cast Drain Life while in troll form which should be interrupted and also spawns cocoons, which hatch small spiders. These should be killed quickly as they grow in size and power the longer they are left alive.

When she transforms into a spider she will root everyone in the raid using Enveloping Webs and charge over to the ranged. The tank there should pick her up and once the Enveloping Webs are gone bring her back to the melee, switching spots with the tank that was there.
While in Troll form she casts:
When in spider form she will cast:

The fight starts once the raid kills Speaker Vilebranch. Mandokir will engage on his mount Oghan. Once he dismounts two tanks should take turns managing the sunder stacks while tanking Oghan far off to the side. Melee should be careful to avoid taking too much damage from Mandokirs Whirlwind. Additionally he will occasionally use Threatening Gaze on a random raider, this includes the tank. The targeted player should stop all actions and wait for the debuff to fade, if the tank is affected DPS should slow to not pull agro.
If a raider dies during the encounter Mandokir will level up gaining increased damage and armor. There are spirits in the room that allow the raid members to self resurrect but again dying makes the boss harder.
If Oghan is killed before Mandokir he will enrage for 1 minute doing extra damage and attacking faster. If the raid chooses to kill Oghan first have the MT use his big cooldowns in that period to survive after which point the fight is pretty easy.
There are 4 encounters here that are on a rotating 2 week roster, and to make the trinkets you need all 4 encounters meaning it will take at least 6 weeks to get the trinket. To trigger an encounter an alchemical item is required using 6x Powerful Mojo, a Black Lotus, a Massive Mojo, and a Blood of Heroes. Once made it can be used 3 times so in effect you need at least 2 made to get one person their trinket. Each boss always drops the item needed for the trinket.
Before starting the encounter, clear the room of imps. The imps can be banished or enslaved by warlocks and each time one dies it creates a portal which summons 2 voidwalkers which have an AoE aura and cannot be banished or enslaved. It's best to kill one imp at a time and then focus down the voidwalkers till all are dead.

The hardest boss in the edge is Hazza'rah who has several nasty abilities. He uses a close burst AoE sleep so ranged should stay away from him and the tank should have HoT's rolling. He also creates illusions that deal huge damage and need to be single target killed, ranged should focus on these. Lastly he does a mana burn that needs to be countered by mana tap from hunters and warlocks.

Renataki is pretty simple. The ranged should group up and when he uses his Vanish ability they should cast low level AoE spells on the group to break his stealth. Hunters should use flares and mark boss where possible.

Gri'lek is fairly straightforward. Ranged should remain spread out as this helps when he drops threat and fixates on a raid member and runs at them. He is pretty slow and should be kited. Melee should avoid getting high threat and let the ranged kite him. It's possible for two ranged to threat swap making him run back and forth without doing any damage. Also he casts a root which needs to be dispelled, especially on people he is fixated on.

Wushoolay will need to have his mana drained by hunters and warlocks. He spawns lightning clouds, which should be avoided. Tanks should try to keep out of the clouds but also keep the boss facing away from the raid as much as possible. Ranged should spread out to minimize who ends up in a cloud when he casts. He also has a poison aura so Nature resist gear is recommended for melee as well as hunter Aspect of the wild.

Clear the area of all crocodiles and fish before triggering the encounter.
One person will need to be a max skill fisher (350 total - 420 for no misses) with lure and have completed a prequest to fight this boss. The quest starts inside the instance at the camp, simply pick up Nat's Measuring Tape and bring it to him in Duskwallow Marsh. Once complete the fisher can buy Mudskunk Lure and use it to fish inside the Muddy Churning Waters for 5 Zulian Mudskunk. Combine these with the Lure will at Nat's fishing spot will trigger the boss.
The raid should all be in the water to avoid the fall damage from Massive Geyser and the tank should simply face him away from the raid.
Fight him in the water.


Thekal comes with Zealot Lor'Khan and Zealot Zath, all 3 of which must die within 10 seconds of each other. During the pull tanks should split up the 3 while the raid quickly kills the two tigers. A rogue should stay on Lor'Khan and interrupt his heals while a mage should have second highest threat on Zath so when the tank gets sapped he can be kited. Disarm can be used on the Zealots to reduce the damage and Lor'Khan can be stunned as well.
The raid can either focus on one and lower them each down to 10% or split their damage across all 3 - it doesn't matter but once all 3 are at 10% they should be brought together and quickly AoE killed which will trigger the second phase of the fight.

Thekal will transform into a tiger, reset agro and deal heavy damage to the tank and the raid. The tank should pull him to a corner and the ranged should keep their distance. When Thekal uses Force Push he clears his agro and a new tank will need to take over. Additionally tigers will spawn throughout phase 2 which can be CCed till the boss is dead at which point they will despawn.


The raid should set up around the gong. Once the gong is rung Arlokk will appear and the main tank should position her near the center of the room.
Panthers will spawn throughout the fight and should be tanked but not killed while she is in the room. Throughout the fight she will shift between panther form and troll form.
When she is still in troll form melee can dps her. While in troll form she will gouge the tank so an off tank will need to be ready to pick her up and return her to the center of the room.

When in panther form no melee DPS should be near her as she has a powerful cleave.
If she is in panther form she will cast Mark of Arlokk on a raid member and all the panthers will focus that player. Fears should be used to keep them at bay. When she disappears the raid should quickly kill all the panthers. When she reappears she will put a dot on a raid member who will need extra healing.
While in troll form Arlokk has:
When Arlokk is in panther form she has:

The room should be cleared before the fight starts. This encounter challenges all players and there are mechanics all players must be aware of. Raiders will occasionally be cursed by Delusions of Jin'do and the affected raider is the only one who can attack the Shades of Jin'Do. The curse should not be removed and the player (even healers) should dps the shades while they can.
After the shades the next highest priority is on destroying the healing totems. All DPS should focus on them and where possible Mortal strike and Wound Poison should be kept on Jin'do to slow the healing he receives. Then there is a the Brain Wash totem which should also be destroyed as the effect only ends once the totem is destroyed.
Only once these are all cleared should players work on the Hexxer himself, making the fight a long and slow one. Jin'do will also use Hex on the highest threat target which can be dispelled, and Teleport which moves a random player into the bone pit and spawns a wave of adds. A mage or two should be ready to clear those. It is a valid strategy to tank him in the pit where the teleport spells sends the players making it faster to deal with.

Now that the corrupt priests are all dead, Hakkar can be engaged. There are several mechanics that need to be managed but overall the fight shouldn't be too hard. Hakkar will use Cause Insanity on the highest threat target - i.e. the main tank, which will charm and buff them and cannot be dispelled. When this happens the tank needs to be CCed.
He will also cast Corrupted Blood on a raid member, which can spread to others. For this reason the raid will be spread out most of the time and the Corrupted Blood should be dispelled.
The most important part is managing his Blood Siphon ability, which heals him for 1k per stack per raid member for 8 seconds and stuns the target. To negate this ability the raid needs to pull a Son of Hakkar and slay him just before the Blood Siphon is due. Then the entire raid minus the main tank need to stand in the poison cloud produced. This poison causes Hakkar to take damage rather than heal. After the effect is over the raid needs to spread out again.
Hakkar enrages after 10 minutes or at 5% life.
Hope you brought a Priest.